Track lighting has become a favorite among DIY enthusiasts who want to transform their spaces with flexible, stylish illumination. Unlike traditional fixed fixtures, track lighting offers the freedom to direct light exactly where you need it, making it perfect for highlighting artwork, creating ambient moods, or providing task lighting in kitchens and workshops. The modular nature of track systems means you can start simple and expand over time, adjusting your lighting as your needs change.
For homeowners tackling their own lighting projects, track systems present an appealing combination of professional results and manageable installation. Most styles require only basic electrical knowledge and common tools, making them accessible even for beginners. Whether you’re renovating a dated room, setting up a home studio, or simply looking to upgrade your lighting game, understanding the different track lighting styles available will help you choose the perfect solution for your space and skill level.
Understanding Track Lighting
Track lighting systems consist of three main components that work together to create a versatile lighting solution. The track itself mounts to your ceiling or wall and contains electrical conductors that power the fixtures. Heads or fixtures attach to the track at any point along its length, giving you complete control over light placement. Finally, the power feed connects the track to your home’s electrical system, typically through a ceiling junction box where an old fixture once hung.
The beauty of track lighting lies in its adaptability. You can slide fixtures along the track, rotate them 360 degrees, and tilt them to focus light precisely where needed. This flexibility makes track systems ideal for spaces that serve multiple purposes or where lighting needs change frequently. A home office might need bright task lighting during work hours but softer ambient lighting for evening relaxation, all achievable by simply adjusting the existing fixtures.
Before diving into specific styles, you’ll need to understand track compatibility. The three standard track types—H, J, and L—are not interchangeable, so fixtures designed for one system won’t fit another. Most modern residential installations use H-type tracks, which offer the widest selection of compatible fixtures. When shopping for components, always verify compatibility between your track and fixtures to avoid frustrating returns.
Installation difficulty varies by style, but most DIY enthusiasts can handle basic track lighting with standard household tools. You’ll typically need a drill, screwdriver, wire stripper, and voltage tester. The key is working safely with your home’s electrical system—always shut off power at the breaker before beginning work and use a voltage tester to confirm the circuit is dead. If you’re uncomfortable with electrical work, consider having a licensed electrician install the track while you handle the simpler task of attaching and positioning the light heads yourself.
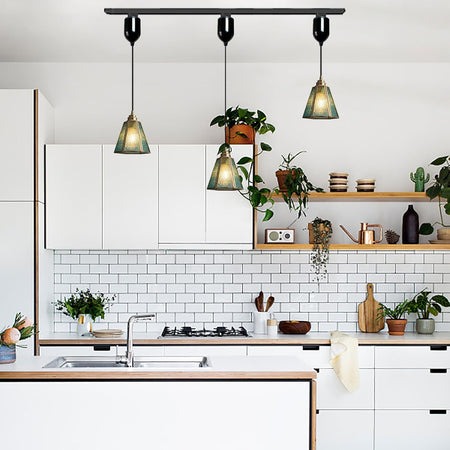
Style 1: Pendant Track Lighting
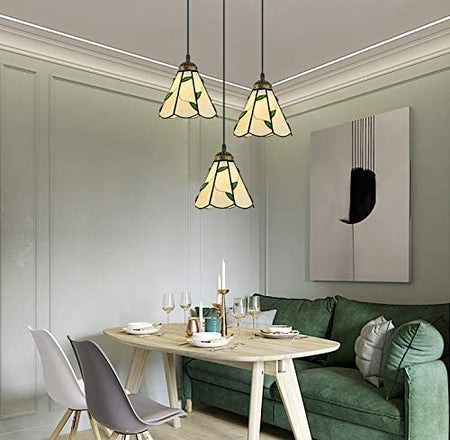
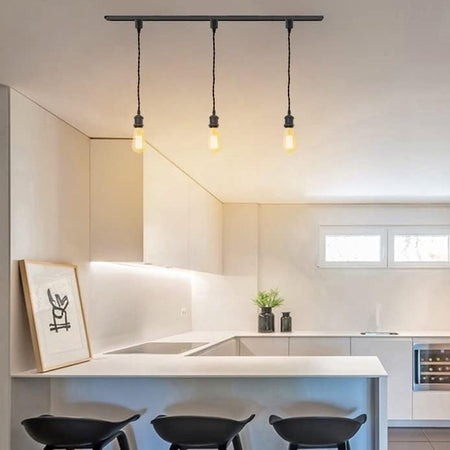
Pendant track lighting brings the elegance of hanging fixtures with the flexibility of track systems, creating a perfect blend for DIY enthusiasts who want both style and functionality. These systems feature decorative shades or globes suspended from the track on adjustable cords or rods, mimicking the look of traditional pendant lights while maintaining the repositioning advantages of track lights. This style works exceptionally well over kitchen islands, dining tables, and breakfast bars where you need focused downward lighting with visual appeal.
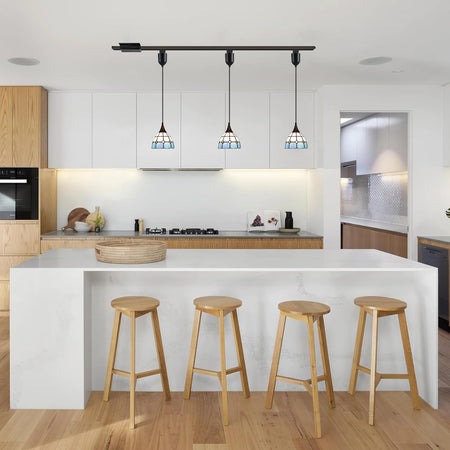
The installation process for pendant track lighting follows the same basic steps as standard track systems, making it approachable for beginners. Start by locating ceiling joists using a stud finder, then mount the track securely with appropriate hardware. Most pendant tracks come with toggle bolts for drywall installation or wood screws for joist mounting. After securing the track and connecting it to your electrical box, simply hang the pendant fixtures at your desired spacing. The adjustable cables or rods let you customize the hanging height, typically ranging from a few inches to several feet below the track.
When planning your pendant track layout, consider both functional and aesthetic requirements. For kitchen islands, position pendants approximately 30 to 36 inches above the countertop to provide adequate task lighting without obstructing sight lines. Space multiple pendants evenly along the track, usually 24 to 30 inches apart, to create balanced illumination. The beauty of track-mounted pendants is that you can experiment with placement before final positioning, moving fixtures along the track until you achieve the perfect arrangement.
Choosing the right pendant shades significantly impacts both light quality and room ambiance. Glass globes create a softer, more diffused light suitable for dining areas, while metal shades with open bottoms direct light downward for focused task lighting. Many DIY enthusiasts appreciate that pendant track systems allow mixing different shade styles on the same track, creating custom combinations that reflect personal taste. You can start with a basic setup and gradually add or swap pendants as your design preferences evolve, making this style both budget-friendly and adaptable to changing décor trends.
Style 2: Adjustable Track Lighting
Adjustable track lighting represents the most versatile option for DIY enthusiasts who need maximum control over their illumination. These systems feature individual spotlight heads that rotate, swivel, and tilt independently, allowing you to direct light beams with precision. Unlike pendant styles that primarily illuminate downward, adjustable track heads can angle in virtually any direction, making them ideal for accent lighting, artwork display, workspace task lighting, or general room illumination. This flexibility means a single track can serve multiple lighting functions simultaneously.
Installing adjustable track lighting requires the same foundational steps as other track systems, but selecting the right track length and configuration demands careful planning. Measure your space and sketch where you need light coverage, then choose straight tracks, L-shaped connectors, or flexible track sections to match your layout. Most DIY installations work best with straight four-foot or eight-foot tracks mounted parallel to walls or centered over key areas. Secure the track to ceiling joists whenever possible for maximum stability, especially when using heavier spotlight heads. Once mounted and wired, snap or twist the adjustable heads onto the track according to manufacturer instructions.
The real advantage emerges when positioning your light heads. Start by spacing fixtures evenly along the track, typically 18 to 24 inches apart for general lighting, then adjust each head individually to eliminate shadows and highlight specific areas. For artwork, angle lights at 30 degrees from the wall to minimize glare while bringing out colors and textures. In home offices or workshops, direct several heads toward your primary work surface to create bright, shadow-free task lighting. The ability to reposition heads without tools means you can continually refine your lighting scheme as furniture moves or needs change.
Choosing bulb types significantly affects both light quality and energy efficiency in adjustable systems. LED bulbs offer the longest lifespan and lowest energy consumption, making them ideal for fixtures that run several hours daily. Consider color temperature carefully—warm white bulbs around 2700K create cozy residential atmospheres, while cooler 4000K bulbs provide crisp, energizing light for workspaces. Many adjustable track heads accommodate dimmable bulbs, adding another layer of control. Install a compatible dimmer switch during setup to adjust brightness levels throughout the day, transforming the same track system from bright task lighting to subtle ambient illumination as needed.
Style 3: Recessed Track Lighting
Recessed track lighting offers a sleek, minimalist aesthetic that appeals to DIY enthusiasts seeking a modern, unobtrusive lighting solution. Unlike surface-mounted tracks that hang below the ceiling, recessed systems install flush within the ceiling plane, creating clean lines that blend seamlessly with contemporary architecture. The track sits in a channel cut into the ceiling, with only the light heads visible below the surface. This streamlined appearance makes recessed track lighting particularly popular in spaces where visual clutter needs minimizing, such as art galleries, modern living rooms, or upscale retail-inspired home spaces.
Installing recessed track lighting presents more challenges than surface-mounted options, requiring additional preparation and ceiling access. You’ll need to cut a narrow channel in your drywall ceiling to accommodate the track housing, which typically measures about two inches wide and several inches deep. This process works best when you have attic access above the installation area, allowing you to route electrical wiring and secure the track housing from above. Begin by marking your track layout on the ceiling, then use a drywall saw to carefully cut the channel. Install the track housing into the channel, securing it to ceiling joists with brackets provided by the manufacturer. After connecting the electrical supply, finish the installation by attaching trim pieces that create a polished edge around the track opening.
The ceiling modification required for recessed tracks means this style demands more time and skill than surface-mounted alternatives. Plan for a full day to complete installation, especially if you’re working solo. You’ll create dust and debris during cutting, so protect furniture and flooring with drop cloths. If your ceiling contains insulation, wear protective gear and consider having a helper manage insulation while you work on the track installation. For ceilings without attic access or in multi-story buildings where the space above is another room, recessed track installation becomes significantly more complex and may warrant professional assistance.
Despite the installation complexity, recessed track lighting delivers substantial aesthetic rewards. The hidden track creates an illusion of floating light fixtures, drawing attention to the illumination rather than the hardware. This style works exceptionally well in rooms with low ceilings where surface-mounted tracks might feel intrusive or create head-clearance issues. Position recessed tracks along room perimeters to wash walls with light, or install them strategically to highlight architectural features without visible hardware competing for attention. The fixtures themselves range from subtle pinhole-style lights to more prominent adjustable heads, giving you flexibility in how much the lighting elements contribute to your room’s visual character. Once installed, recessed tracks function identically to surface-mounted systems, allowing you to reposition fixtures along the track and adjust angles as needed while maintaining that clean, integrated appearance.
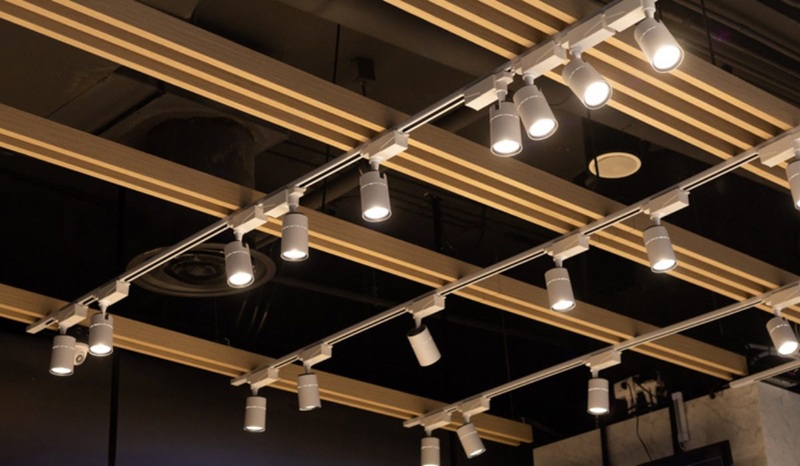
Style 4: Industrial Track Lighting
Industrial track lighting brings raw, utilitarian aesthetics into residential spaces, appealing to DIY enthusiasts who appreciate exposed hardware and vintage-inspired design. This style features robust metal fixtures with visible mechanical elements, often finished in matte black, brushed steel, or aged bronze. The fixtures typically showcase Edison-style bulbs, metal cages, barn-style shades, or exposed sockets that celebrate the functional beauty of electrical components. Industrial track lighting transforms garages, basements, lofts, and modern farmhouse kitchens into spaces with character and edge, proving that practical lighting can make a bold design statement.
Installing industrial track systems follows standard track lighting procedures, but the heavier fixture weight requires attention to mounting strength. Industrial-style heads often weigh more than sleek modern alternatives due to substantial metal construction, so verify that your chosen track system supports the combined weight of all fixtures. Mount tracks directly into ceiling joists whenever possible, using wood screws rather than toggle bolts for maximum support. If joist placement doesn’t align with your desired track location, install blocking between joists or use heavy-duty ceiling anchors rated for the total fixture weight plus a safety margin. After securing the track and completing electrical connections, attach the industrial heads, ensuring each locks firmly into place.
The fixture selection process defines your industrial lighting’s character and functionality. Cage-style fixtures with metal guards create an authentic workshop atmosphere while protecting bulbs in active spaces like home gyms or craft rooms. Gooseneck fixtures with curved arms add vintage charm to kitchens and dining areas, directing light downward while contributing architectural interest. Cone-shaped metal shades focus light precisely, making them excellent for task lighting over workbenches or kitchen counters. Many DIY enthusiasts mix different industrial fixture styles on the same track, creating eclectic combinations that feel curated rather than matching. Manufacturers like KIVENLIGHTING offer various industrial fixture options that allow you to start with a few signature pieces and expand your collection gradually, building a lighting system that evolves with your space.
Bulb selection significantly impacts the industrial aesthetic and practical performance. Vintage-style Edison bulbs with visible filaments enhance the retro-industrial look, their warm amber glow creating inviting atmospheres in living spaces. However, traditional incandescent Edison bulbs consume considerable energy and generate heat, making LED Edison-style alternatives more practical for everyday use. These LED versions replicate the filament appearance while offering energy efficiency and cool operation. For workshops and task-oriented spaces, consider clear or frosted standard bulbs that maximize light output without the decorative emphasis. Industrial fixtures often leave bulbs fully or partially exposed, so choose bulbs that complement your fixtures visually while providing appropriate brightness levels. Dimmable options add versatility, allowing you to shift from bright work lighting to moody ambient illumination, proving that industrial style adapts beautifully to various functional needs throughout your home.
Style 5: Solar Track Lighting
Solar track lighting offers an eco-friendly alternative for DIY enthusiasts seeking sustainable illumination solutions, particularly in outdoor spaces or areas where electrical wiring presents challenges. These systems harness sunlight through photovoltaic panels that charge integrated batteries during daylight hours, then power LED fixtures automatically after dark. Solar track lighting works exceptionally well for patios, decks, pergolas, garden pathways, and garages where running electrical lines would require extensive work or professional assistance. While solar options provide less brightness than hardwired systems, advancing technology has made them increasingly viable for ambient lighting and accent applications.
Installing solar track lighting eliminates electrical complexity entirely, making it the most accessible option for beginners. Most systems arrive as complete kits with solar panels, rechargeable batteries, tracks, and fixtures included. Begin by selecting a location where the solar panel receives direct sunlight for at least six hours daily—southern exposure in the Northern Hemisphere provides optimal charging. Mount the solar panel on a roof edge, fence post, or dedicated pole using the included hardware, angling it toward the sun. Next, attach the track to your chosen surface using screws or mounting brackets, ensuring it’s level and secure. Connect the low-voltage wire from the solar panel to the track’s power input, then snap the LED fixtures onto the track. No electrical permits, wire stripping, or circuit breakers required.
The primary limitation of solar track lighting involves brightness and runtime, which depend entirely on battery capacity and daily sun exposure. Cloudy weather, winter months with shorter days, and shaded installation sites all reduce charging efficiency, resulting in dimmer lights or shorter operating hours. Most solar track systems provide three to eight hours of illumination per charge, adequate for evening entertainment but insufficient for all-night security lighting. To maximize performance, keep solar panels clean by wiping away dust, pollen, and debris monthly. Position panels away from tree shadows that shift throughout the day, and consider upgrading to systems with larger panels or higher-capacity batteries if your initial setup underperforms.
Solar track lighting excels in specific applications where its benefits outweigh brightness limitations. Illuminate outdoor dining areas with warm ambient light that enhances evening gatherings without overwhelming conversation spaces. Highlight garden features, architectural details, or landscaping elements with strategically positioned accent lights that showcase your outdoor environment after sunset. Use solar tracks in sheds, workshops, or detached garages where running electrical lines would cost hundreds of dollars, accepting moderate brightness in exchange for installation simplicity and zero operating costs. Many systems include dusk-to-dawn sensors that automate operation, and some offer motion detection that conserves battery power by activating lights only when needed. For DIY enthusiasts committed to reducing energy consumption and carbon footprint, solar track lighting represents a practical step toward sustainable home improvement, proving that environmentally responsible choices can deliver both functional lighting and installation satisfaction.
Choosing Your Perfect Track Lighting Style
Choosing the right track lighting style transforms your DIY project from simple fixture replacement into a comprehensive lighting upgrade that enhances both functionality and aesthetics. Each of the five styles covered offers distinct advantages—pendant tracks bring elegance to dining spaces, adjustable systems provide maximum versatility, recessed options deliver modern minimalism, industrial fixtures add character and edge, while solar alternatives offer sustainable outdoor solutions. Your selection should balance practical considerations like installation complexity and brightness requirements with design preferences that complement your home’s existing style.
The beauty of track lighting lies in its forgiving nature for DIY enthusiasts. You can start with a basic system and expand gradually, experimenting with fixture placement and styles without permanent commitment. Most installations require only weekend time commitment and basic tools, making professional results accessible even for beginners willing to follow instructions carefully. Whether you’re illuminating artwork, upgrading kitchen task lighting, or creating ambiance in living spaces, track lighting systems reward your DIY efforts with flexible, customizable illumination that adapts as your needs evolve. Take measurements, verify electrical compatibility, gather your tools, and confidently tackle a lighting upgrade that delivers both immediate satisfaction and long-term functionality.